TeamBoard is a historically well established Canadian display brand, dating back to its involvement in the inception of the interactive whiteboard over 25 years ago.
Fast forward to 2023 and you will find TeamBoardnowdesigns and manufactures interactive flat panels for the corporate, government and education sectors. With its headquarters in Toronto, Canada serving a growing international customer base through a global network of distributors.
After reporting its recent run of successes in the Asia Pacific market (becoming a major supplier to some of the largest government contracts in the Southern Hemisphere) TeamBoard are ecstatic to appoint a key distributor in its home territory of Canada.
Andrew Shaw, TeamBoard Director says, ‘This announcement is a special one for us, being a Canadian brand. We have been looking for the perfect appointment to re-launch our latest range of TeamBoard range of products in Canada. On the back of our successful Asia Pacific launch coupled with the product mix TeamBoard now boasts, we are certain our partnership with Techni+Contact can bring much value to this incredibly important market for the brand’.
Julie Legault, President at Techni + Contact says, ‘We are excited to add such a well-known Canadian brand to our product range. We are looking forward to introducing our partners to this exciting new TeamBoard product line and replicating the recent successes from across the globe here in Canada’.
Where can I find out more?
Infocomm 2023 – Orlando (booth N261)
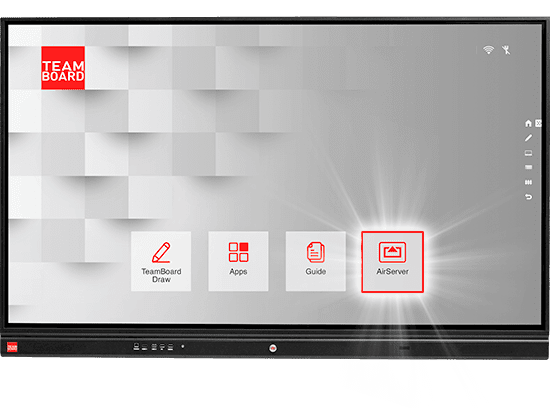
TeamBoard launches its latest range of 55”- 110” IFPs complete with Android 11 and built-in Airserver wireless solution at Infocomm 2023. These will be available in its IR range, the new TeamBoard PCAP range as well as the latest TeamBoard Ultimate 105”, 21:9 touchscreen. In addition to this, TeamBoard will be offering the Airserver Connect 2 wireless solution as well as the unique TeamBoard mobile solution range for the North American market.
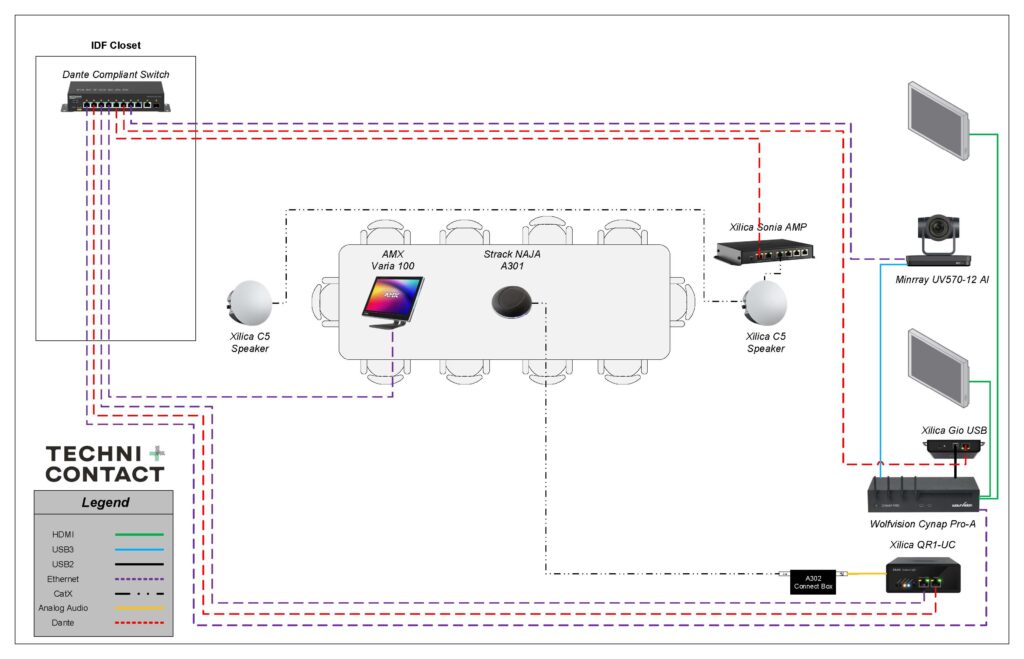
Check out our latest networked meeting room solution – easy to install, competitively priced and shipping! It features, S-Track Naja A301 microphones, a Xilica QR1 DSP, Xilica Sonia Speakers and Amplifier with the Gio bluetooth to Dante module, an AMX Varia touchpanel, a Minrray video camera and the WolfVision Cynap Pro-A for a complete meeting room collaboration solution! And best of all, it’s all shipping!
Nearity is a leading manufacturer of innovative hardware solutions for distance collaboration.
A truly beneficial partnership, NEARITY’s proprietary audio technology and large development team provide Techni+Contact with an important set of tools to solve complex and difficult hybrid-work and audio-conferencing problems by combining internally developed AI signal processing with premium hardware design. From individual speakermics for individual contributors to complex integrated ceiling arrays for auditoriums, NEARITY’s product portfolio creates new ways for Techni+Contact to help AV Professionals meet difficult challenges and challenging budgets.
Yealink is a global-leading provider of Unified Communication & Collaboration Solutions specialized in video conferencing, voice communications, and collaboration.
Yealink’s Microsoft Teams Room and Zoom Solutions have become an industry standard in the video conferencing market. Yealink’s recent collaboration with AMX by Harman also ensure the market can deliver a simple and quality Teams meeting experience. Yealink’s solutions can be found in Finance, Education, Healthcare, and Manufacturing.
“I’m delighted with the appointment of Techni+Contact Canada Ltd as a distributor for Canada. A well-established, customer-focused company, committed to providing the highest quality solutions available, Techni+Contact is an outstanding addition to our worldwide distribution network.” Ethan Liu, Account Executive, Yealink.
“Our client-base rely on us to offer best of breed technology solutions to maximize the user’ UC experience, improve collaboration and boost productivity while also reducing costs. Yealink’s UC solutions cover a wide range of usage scenarios, based on open standards and provide excellent compatibility and interoperability with leading UC platforms. This is very important to us as distributor to ensure we meet a wide range of needs cost-effectively”, according to Julie Legault, President, Techni+Contact Canada.
About Techni+Contact Canada
For over 40 years, Techni+Contact Canada Ltd has been building its reputation as an audio-visual importer and distributor. With its national reach, the company has leveraged its experience in commercial integration and complete solutions to its loyal dealer and consultant networks. Learn more at Techni+Contact.
About Yealink
Yealink is Yealink is a global-leading provider of Unified Communication & Collaboration Solutions specialized in video conferencing, voice communications, and collaboration, dedicated to helping every person and organization embrace the power of “Easy Collaboration, High Productivity”. Yealink ranks No.1 in the global market share of IP Phone and is the Top 5 leader in the video conferencing market (Frost & Sullivan, 2021). For more information, visit Yealink | UC & C Terminal, Video Collaboration, Conference Phone, IP Phone, Headsets & Video Conferencing
Yealink is a gloMissing Xilica “Download Project Backup File”. There are two different scenarios that will cause this: – When you push the file to the unit, you are prompted if you want to save the project or “cancel”. On first glance it’s easy to think that the “save” is to your PC when it actually saves the file to the unit itself for recovery. – If you have more than one QR1 in a project, the “Master” unit is the one that contains the backup file. Xilica elects the master unit as the one who arbitrarily holds the Project Scheduler. One option is to right-click on the unit and “Export Device Design to File”. You would then still have to create a new project but will have the option to “import” this file. It won’t have your Project controller configuration, etc. but will save you from having to start over for the actual DSP file.
ISSUE: Upon reset of either device by either system reboot, power failure or USB unplugging the levels of the USB card drop to 25 percent. This behavior is by design by the Xilica Engineers for safety at boot up.
REQUIRES FIRMWARE solaro_k02_usb_v9.9.xfw(obtain from )
SOLUTIONS: There are several options that will be described in detail below.
Automatic Commands from Wolfvision(Power-on) On-Demand Commands from Wolfvision Control Centre On-Demand Commands from Xilica Xtouch(logic solution)
HEX CODES AND THIRD-PARTY CONTROL NAMES
For the purposes of this example, we have used the following codes and names on the devices. You are free to use these codes and control names but the naming convention may interfere with your current system. (NOTE: when making control names, they are case sensitive)
USB SPEAKER
Xilica Control Name = “SpkrVol”
HEX convert = SET SpkrVol 100: “5345542053706b72566f6c203130300d”
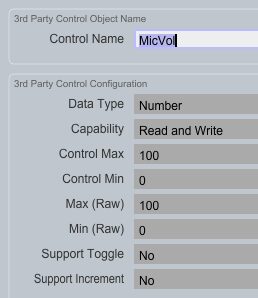
USB MIC
Xilica Control Name = “MicVol”
HEX Convert = SET MicVol 100: “534554204d6963566f6c203130300d”
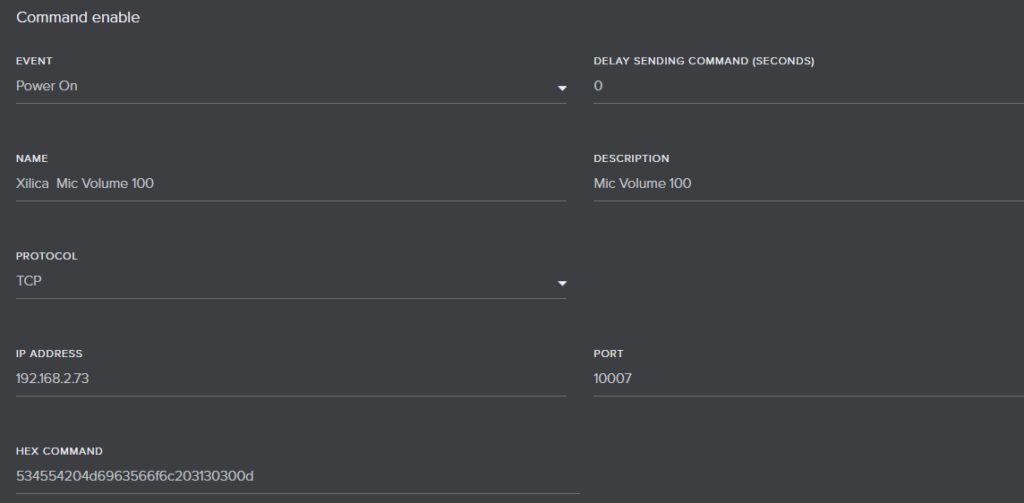
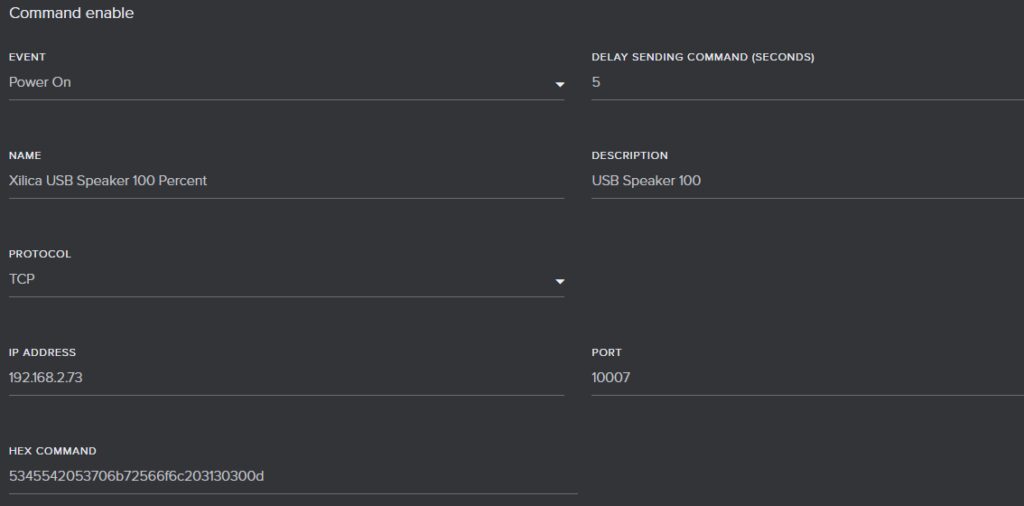
Automatic Commands from Wolfvision(Power ON)
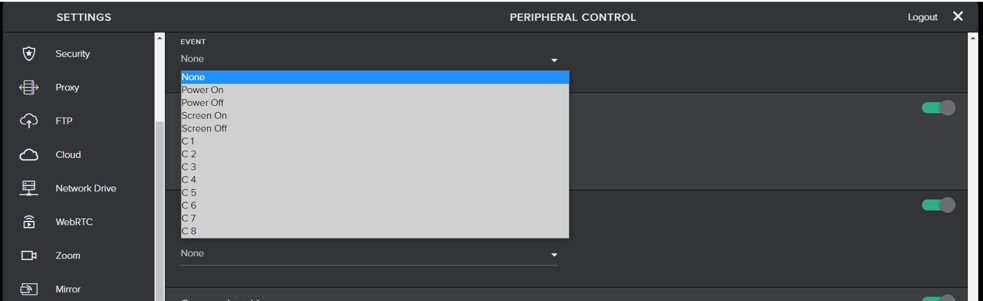
During the “Power-On” sequence of any Cynap, the device can send out control commands via the Peripheral Control option tab in the menu.
Start by naming the USB Mic Volume in Xilica Designer. Hold down the CTRL key + right mouse click to create a Third Party control name (Note: this is case sensitive)
In this example, it is named MicVol.
Press ok when done
When successful in creating a control name to the Mic Volume, a RED control indicator will illuminate in the upper lefthand corner of the fader as shown below.
Repeat the previous steps for the USB speaker but name it “SpkrVol”
Log on the Wolfvision Cynap by entering the IP address into any web browser.
Enter the Password(default is “Password” unless it has been changed)
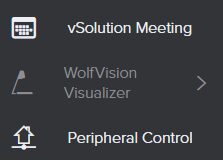
Navigate to the Peripheral Control Tab at the bottom of the lefthand menu
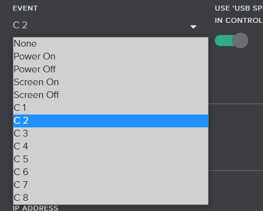
From the EVENT drop-down list select POWER-ON
Enter the data in the fields(see HEX CODES AND THIRD-PARTY CONTROL NAMES)
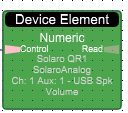
The IP address will be the IP address of the Xilica Solaro in your system that you are wanting to control. For this example, the IP address shows the IP address of the Solaro for this example
USB Mic
USB Speaker(Note the delay of 5 seconds in sending the command. This will give some time for the previous command to complete)
NOTE: In the HEX field, there can be no spaces. The name and description are custom fields and can be you please.
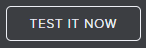
Once the data is entered, please press “SAVE”. This will activate the control and prompt a “TEST IT NOW” icon to appear
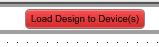
Before pressing the “TEST IT NOW” button, return to Xilica Designer and load the design to the Solaro by pressing the “Load design to Device(s)” Icon
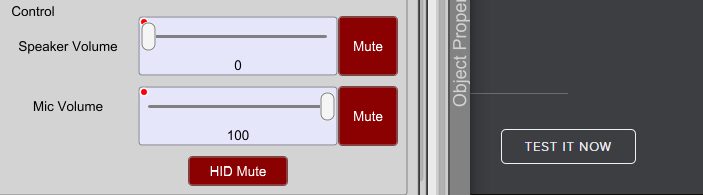
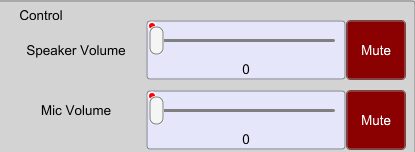
Ensure that you are ONLINE with the Solaro and open the USB input card.
Slide the Control Speaker and Mic to Zero.
(Note the two RED control indicators in each block)
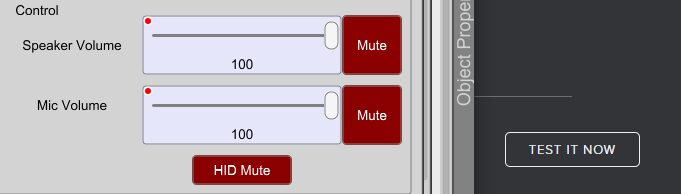
With the Wolfvision open in a browser and Xilica Designer open beside the Wolfvision screen, press the “TEST IT NOW” to ensure commands are working and volumes are being set to one hundred.
On-Demand Commands From Wolfvision Control Centre
On occasion the user may need to reset the levels in the Xilica due to a firmware update of the Xilica Solaro, power cycle of the Solaro or USB disconnection. The following will describe the on-demand solution of resetting the levels to 100 percent from the Wolfvision Command Centre.
Start by naming the USB Mic Volume in Xilica designer. Hold down the CTRL key + right mouse click to create a third party control name(Note: this is case sensitive)
In this example, it is named MicVol.
Press ok when done
When successful in creating a control name to the Mic Volume, a RED control indicator will illuminate in the upper lefthand corner of the fader as shown below.
Repeat the previous steps for the USB speaker but name it “SpkrVol”
Log on the Wolfvision Cynap by entering the IP address into any web browser.
Enter the Password (default is “Password” unless it has been changed)
Navigate to the Peripheral Control Tab at the bottom of the lefthand menu
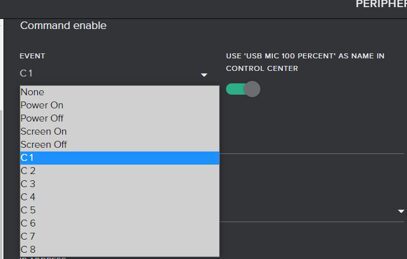
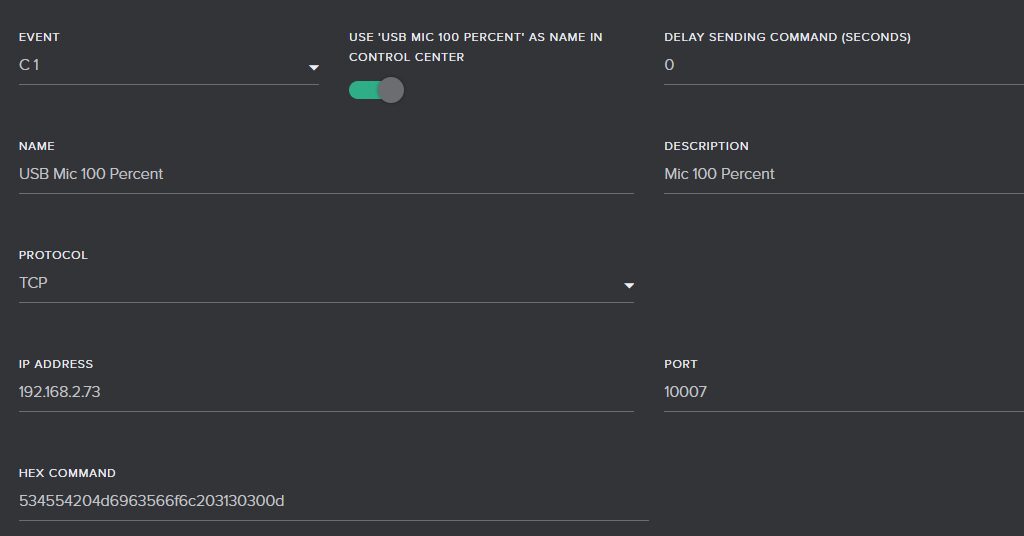
From the EVENT drop-down list select C1
Enter all the data in the fields(see HEX CODES AND THIRD-PARTY CONTROL NAMES)
The IP address will be the IP address of the Xilica Solaro in your system that you are wanting to control. For this example, the IP address shows the IP address of the Solaro for this example.
Be sure to have the “USE USB MIC 100 PERCENT AS NAME IN CONTROL PANEL” enabled
NOTE: In the HEX field, there can be no spaces. The name and description are custom fields and can be as you please.
Once the data is entered, please press “SAVE”. This will activate the control and prompt a “TEST IT NOW” icon to appear
Before pressing the “TEST IT NOW” button, return to Xilica Designer and load the design to the Solaro by pressing the “Load design to Device(s)” Icon
Ensure that you are ONLINE with the Solaro and open the USB input card.
Slide the Control Speaker and Mic to Zero.
(Note the two RED control indicators in each block)
With the Wolfvision open in a browser and Xilica Designer open beside the Wolfvision screen, press the “TEST IT NOW” to ensure commands are working and volumes are being set to one hundred.
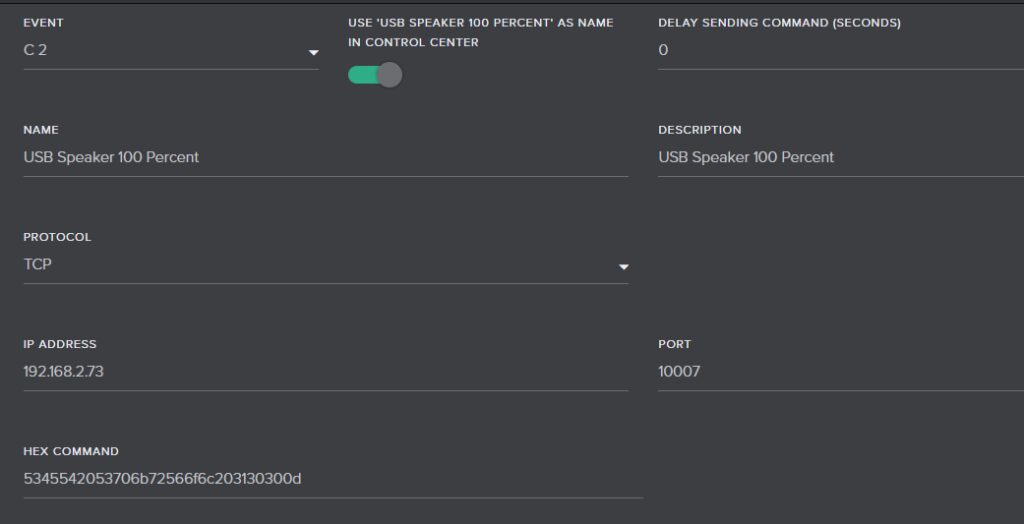
From the EVENT drop-down list select C2
Enter all the data in the fields (see HEX CODES AND THIRD-PARTY CONTROL NAMES)
The IP address will be the IP address of the Xilica Solaro in your system that you are wanting to control. For this example, the IP address shows the IP address of the Solaro for this example.
Be sure to have the “USE USB SPEAKER 100 PERCENT AS NAME IN CONTROL PANEL” enabled
NOTE: In the HEX field, there can be no spaces. The name and description are custom fields and can be as you please.
Once the data is entered, please press “SAVE”. This will activate the control and prompt a “TEST IT NOW” icon to appear
Before pressing the “TEST IT NOW” button, return to Xilica Designer and load the design to the Solaro by pressing the “Load design to Device(s)” Icon
Ensure that you are ONLINE with the Solaro and open the USB input card.
Slide the Control Speaker and Mic to Zero.
(Note the two RED control indicators in each block)
With the Wolfvision open in a browser and Xilica Designer open beside the Wolfvision screen, press the “TEST IT NOW” to ensure commands are working and volumes are being set to one hundred.
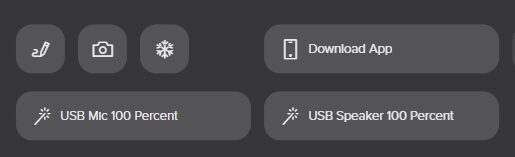
Open the control centre on the main page of the Wolfvision Cynap. Two icons will now appear that have been created through the control process.
Slide the Control Speaker and Mic to Zero.
Once either one of the icons are pressed, the corresponing volume will move to one hundred.
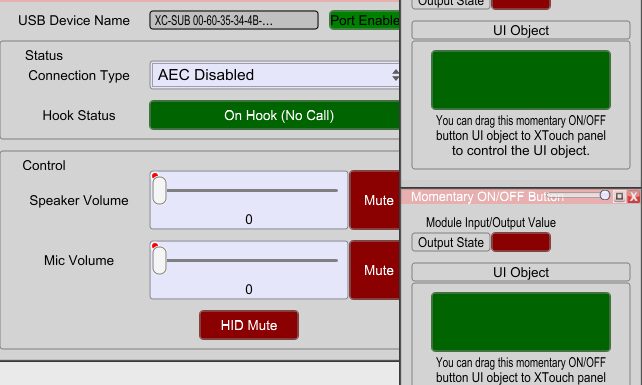
On-Demand Commands From Xilica Xtouch(logic solution)
On occasion the user may want to reset the levels in Xilica due to a firmware update of the Xilica Solaro, power cycle of the Solaro or USB disconnection. The following will describe the on-demand solution of resetting the levels to 100 percent from Xtouch panels or Designer.
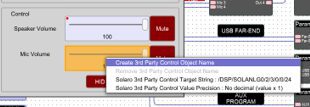
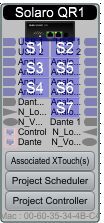
While holding down the CTRL key, drag the USB Speaker Volume into the Project Controller section of Designer
This now gives an element controllable by logic
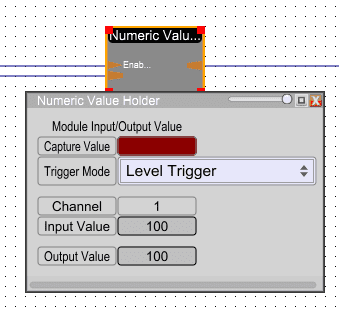
Next insert a Numeric Value Holder Module and modify Triger mode to “Level Trigger”
Insert a Numeric Constant Module and modify the Constant Values to “100”
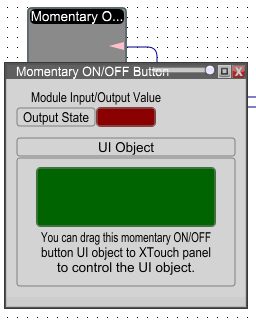
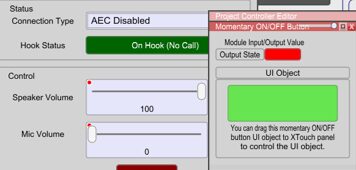
Finally, insert a Momentary ON/OFF Button. This is what you can place in an XTouch screen and activate the setting
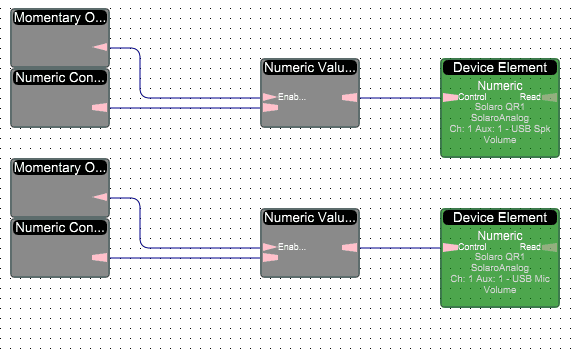
Repeat previous steps for the Mic Volume and have a logic lay out like below.
Save and “Load Design to Device(s)”
This can now be tested by going online and opening Project Controller and the USB input card.
The levels are set to zero.(Note: if using this method solely, the RED control indicator in the upper lefthand corner will not be present.)
Once triggered by the UI object(momentary button), the volume will be set to one hundred.
After the decision by Microsoft to remove support for Basic Authentication in Exchange Online, we have been working feverishly to develop a solution that would enable Book customers to continue using their panels. We are pleased to announce a firmware update which will add support for Modern Authentication to Book Scheduling panels through RMS.
This new firmware will add the ability for Book panels to connect to RMS without the need for a NetLinx processor or any programming. RMS, which supports Modern Authentication, will handle communications to Exchange and distribute the room schedules to each Book panel.In order to handle the Modern Authentication for the RoomBook panels, an RMS installation is required. This software is required to be installed in Windows Server environments. A virtual server is acceptable for these installations, and details on the requirements can be obtained from the documentation for RMS or from Technical Support. See https://www.amx.com/en-US/product_families/resource-management-suite-rms for information on RMS.
The steps to an RMS installation are as follows:
1. Set up a Windows Server (virtual is fine) to run the RMS server application. If an external SQL database is available for hosting the RMS database, then it can be used instead of a separate SQL server being required.
3. Set up a Windows Server to run the RMS Scheduling Server application. This will be the server that will handle the connection to Exchange/Office365 using Modern Authentication.
4. Download and install the RMS Scheduling App for Exchange onto the server set up in step 3 and then walk through the configuration portion to set up communication to Exchange/O365 and connect to the necessary mailboxes. This server will also connect to the RMS Server application set up in step 2. This application can be downloaded here https://www.amx.com/en-US/softwares/rms-enterprise-scheduling-interface-for-exchange-v1-2-3
5. Upgrade each RoomBook Panel to the new firmware. There are different files for the MD/MT panels and AcendoBook/RoomBook panels. Install the firmware appropriate for the panel being used.
6. Configure each RoomBook panel to point to the newly configured RMS server and then add that panel as a location in RMS that corresponds to its mailbox.
Harman Technical Support is available to discuss the server requirements for hosting RMS and is also available remotely to help with the actual installations and setup if desired.
The sound and video system at City Church (Madison Wisconsin) was out of date. The 800-seat auditorium needed an integrated audio-video network that could also serve other parts of the building as well as remotely located people attending services via live streaming multimedia.
Dante AV technology from Audinate brings audio and video together on a single Ethernet-based network. Patton is the first-ever company to implement Dante AV with its FiberPlex 6000 AVoIP Gateway product line. Patton’s AVoIP gateway was a perfect fit for the needs of City Church.
Employing the Patton gateways, City Church was able to migrate its disparate audio and video systems into a single, centrally managed network that provides live, onsite multi-media, that can be distributed throughout the building, as well as live-streamed audio-video for remotely-located worshippers.
“We have always believed in using technology to eliminate distractions and deliver our message in a clear, compelling, and engaging way,” said Nathan Rohde, worship pastor, City Church.
“We basically just did a complete overhaul of the entire sanctuary so we can now integrate audio and video seamlessly throughout our church, our education facilities and online,” Mr. Rohde said.
What did you think?
Is your house of worship (HOW) in need of a media-system update?
Does consolidating disparate audio and video networks into a single centrally managed system sound like a good idea to you?
Attend our 1st leg of the Let’s Connect 2022 Techni+Contact/AMX Canada Roadshow in Toronto!
Meet and speak with leading industry manufacturers from AMX by Harman, Patton Electronics, Spinetix, Stewart Audio, Utelogy, WolfVision, and more! Network with top Audio/Visual, UC and IT integrators, consultants and end users.
In addition to tabletop product displays and functional demos, seminars will be offered throughout the day on key industry topics and solutions for the Educational, Government and Corporate markets with emphasis on active learning, web conferencing, and unified communications:
10:00 -10:30 The Future of Control and Unified Solutions with AMX by Harman
11:00- 11:30 Network AV-based Solutions for Collaboration Spaces by Jon Ivar of WolfVision
12:30-1:00 Keynote Consultant Engagement (TBC)
2:00-2:30 The Future of Control and Unified Solutions with AMX by Harman
3:00-3:30 Network AV-based Solutions for Collaboration Spaces by Jon Ivar of WolfVision
Refreshments and lunch offered. Come get your swag, giveaways and door prizes!
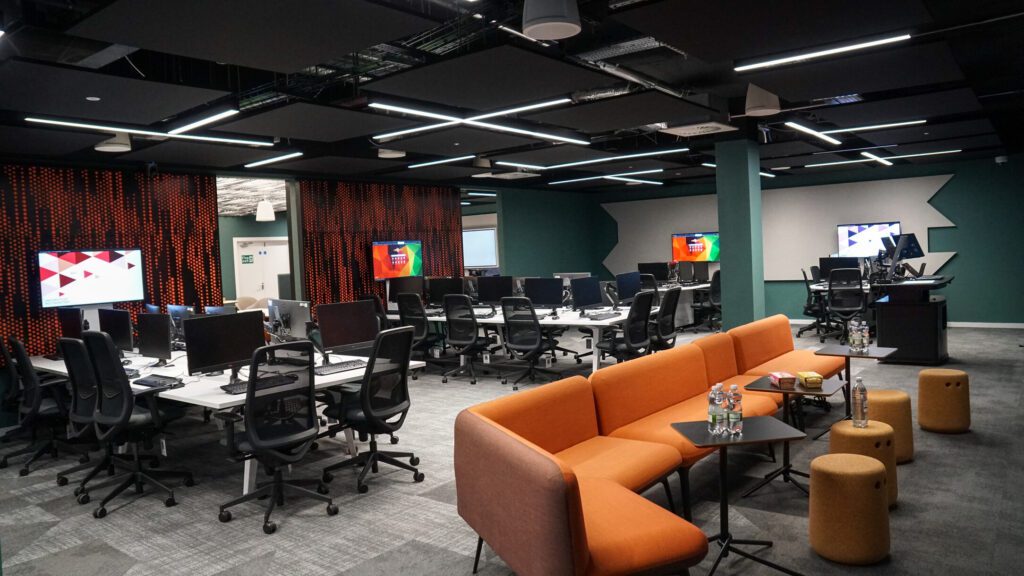
We would like to highlight our latest case study, focusing on the outstanding Cynap / vSolution MATRIX-equipped active learning classrooms at The University of Westminster in London. This award-winning, flexible AV over IP-based technology is ideal for multi-screen, collaborative working and learning environments of all types.
PChanges to Cynap Pure & Cynap Pure Receiver systems
We are currently introducing changes to some of our Cynap Pure products. The Cynap Pure and the Cynap Pure Receiver will shortly be delivered using new hardware with the same form factor as the Cynap Pure Mini. The new hardware is significantly smaller, consumes over 50 percent less power, and is equipped with two USB ports in addition to its HDMI, LAN, and WLAN interfaces.
Apart from the new hardware, there are no other changes for the end user! Screen mirroring using AirPlay, Chromecast or Miracast, touchback and remote viewer functionality, secure encryption, flexible installation options, API modules for room control, remote management tools, free firmware updates, and more – all are available as before when using Cynap Pure solutions.
Changeover to the new hardware will take place during September. We have a large quantity of the new platform devices in stock and can deliver quickly.